It seems a somewhat common scenario that a small
business running all Windows gets to a point where something, some software
package for whatever reason, is better suited to a Linux-based server. It would
be simple to create the required server as a standalone and move along to other
things, but wouldn’t it be better to let your users use their everyday Active
Directory domain credentials to interact with Linux-based services like they
already do for Windows?
I had just such a scenario occur on a project recently, to migrate our Windows-based VisualSVN repositories to a Linux-based Git server. Glossing over the significant differences between Subversion and Git, this is how I went about building a domain-joined Ubuntu Linux server supporting authentication via both username/password and SSH keypairs, all managed in Active Directory.
To be successful with this guide you should have some basic familiarity with managing a Linux server on the command line, but I’ve included as much detail as reasonably possible. You’ll need to use sudo for most of the commands presented here.
Installing Ubuntu
First thing’s first; Download and install the
Ubuntu Server 18.04 LTS image from the official website, here: https://www.ubuntu.com/download/server. If you’re not familiar with Ubuntu installations, you can
essentially take all of the default options and you’ll end up with a working
server, ready for the next steps. You’ll just need to supply a username and
password for the initial user account. Be sure to configure the networking
options as well if you’re not planning to use DHCP. Ensuring that DNS points to
your AD domain controller is critical so be sure the configuration is correct.
Once the installation has completed, access the
server command line with an admin account via virtual console or SSH in order
to continue.
Before anything else, we need to confirm that
the network configuration is correct so Ubuntu can find our domain controllers when
we’re ready to join the domain. To do that review the interface configuration
with the following command:
ifconfig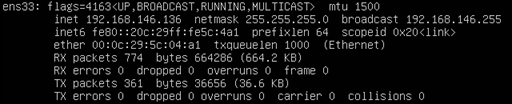
I’m using VMware Workstation here and this
address is on the same network with my domain controller, so this looks good.
As of Ubuntu 17.10 we can work with Netplan,
which reads yaml configuration files and generates the necessary network
configurations. We can check the post-install configuration in the
50-cloud-init.yaml file:
cat /etc/netplan/50-cloud-init.yaml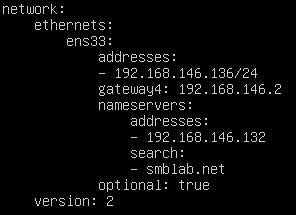
I did a manual configuration of my network
interface during installation, and this matches what I configured so I should
be good to go. Note that 192.168.146.132 in the image above is the IP of the
DNS server/domain controller that holds the domain I’ll be joining. You can
edit this file manually if needed. Be sure to use spaces in groups of four for
indentation as Netplan does not appreciate tabs in its yaml files.
Package Installation
In order to accomplish what we’re trying to do
here, we’ll need to install a few additional packages. We’ll start by updating
our Ubuntu install. apt-get update will update the list of
packages and apt-get upgrade will actually perform the update.
apt update && apt upgrade
This may take several minutes to run. When
finished, we’re ready to install the additional packages that we need.
apt install -y realmd sssd sssd-tools libnss-sss libpam-sss krb5-user adcli samba-common-bin
During the installation process you’ll be prompted
to provide some information about your domain and domain controllers. Enter the
domain name and DC server names as needed.
Configuration
With the packages installed, we can get to the
configuration. First, we’ll configure Kerberos by editing the krb5.conf file. I
like Nano for editing text files but feel free to use Vim or whatever you may
prefer.
nano /etc/krb5.conf
Once we have the file open in our text editor,
we want to add the following two configuration lines under the section for our
realm.
dns_lookup_kdc = truedns_lookup_realm = true
Save and exit the file (In Nano, Ctrl + X, then
Yes, then Enter).
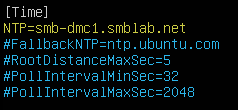
Next, we’ll configure NTP so our server is
syncing time with the domain controller. Open /etc/systemd/timesyncd.conf in
your editor.
nano /etc/systemd/timesyncd.conf
Uncomment the #NTP= line (remove the hash sign)
and type the fully qualified domain name of your domain controller after the
equals sign.
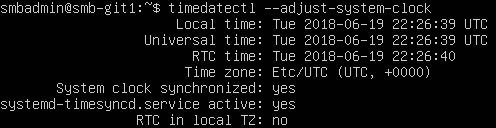
Save and exit the file. Now, we’ll force a time
sync by running the following commands at the prompt.
timedatectl set-ntp truesystemctl restart systemd-timesyncd.service
timedatectl --adjust-system-clock
Now it’s time to setup our realm configuration.
We’ll use realmd to configure our domain connectivity for us using sssd
instead of winbind. If you don’t know what any of that means I encourage
you to do a bit of research for your own understanding, but it isn’t material
to this process.
We actually need to create the realmd.conf file
from scratch. We’ll start by creating the file (opening it in a text editor).
nano /etc/realmd.conf
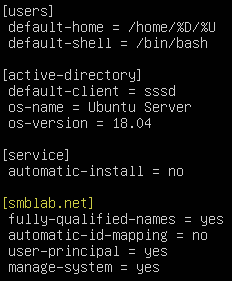
Save and exit the file.
Next, we’ll configure pam (pluggable
authentication modules) and set it to create home directories for domain users
when they first log in (so they don’t need to be created in advance by an
admin). Be sure to sudo for this command or it may fail in the background and create some confusion later.
pam-auth-update

Select the option to Create home directory on
login, then select OK.
Now let’s make sure that realmd can see our
Active Directory domain with the discover command.
realm discover -v smblab.net
If your networking is configured properly and
Ubuntu can see the SRV record for your domain controller in DNS, you should see
something like this:
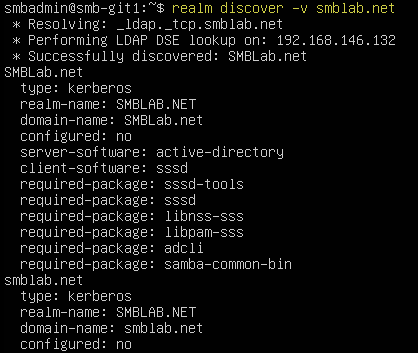
If you get an error message here, go back and
review your interface/netplan settings. If you see something similar to the
above, you’re ready to continue.
Now we’ll use the realm join command to
actually join the domain and configure sssd to communicate with it. For this
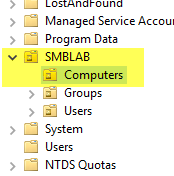
step, we’ll need to know which OU we want to initially place this server into.
I’m going to put it into my site’s Computers OU.
Note that the --user parameter must be a domain
admin or other domain user with permission to join computers to the domain and
place them into the specified OU.
realm join --verbose --user=Administrator --computer-ou=ou=Computers,ou=SMBLAB,dc=smblab,dc=net smblab.net --install=/
The --install=/ switch at the end tells realm
to install any necessary dependencies when the command is run. I found that
more often than not the command would error out without it.

Notice when running the command you’re prompted
first for your current account credentials in order to elevate to sudo, then
prompted for the password for the domain account that you provided in the
--user parameter.
If all has gone well, you’ll get a success
message from realmd:
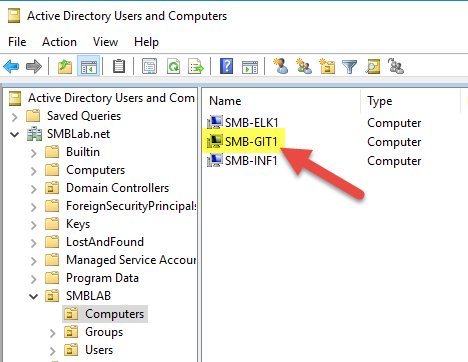
You’ll see the Ubuntu server name listed in
ADUC within the OU specified in --computer-ou. Mine is named SMB-GIT1, as I mentioned a Subversion to Git migration was the impetus for this project.
Next we’ll open up the sssd config file
in our text editor.
nano /etc/sssd/sssd.conf
We want to do four things here:
- Add ssh to the services = section.
- Verify that ldap_id_mapping = True is set (this
is the default)
- Change use_fully_qualified_names to False.
- Add ldap_user_ssh_public_key = altSecurityIdentities
The third item is a quality of life change that
I applied but it isn’t required. It allows domain users to login to Ubuntu with
just their username instead of the UPN (<user> instead of
<user>@<domain>). The final item specifies the
altSecurityIdentities attribute within an AD user account that we’re going to
use to store our SSH public key. Here’s what my file looks like after making
the necessary changes.

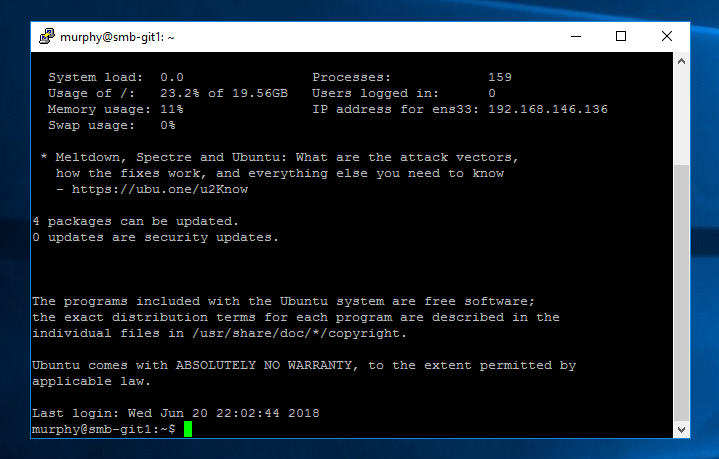
At this stage, all of the AD parts are connected
and we should be able to log in to the console with a domain username. I’ll log
in with my domain user “murphy”.

The login is successful and in addition to the MOTD info I can see that my home directory for the domain user was created automatically in /home/SMBLab.net/murphy.
The login is successful and in addition to the MOTD info I can see that my home directory for the domain user was created automatically in /home/SMBLab.net/murphy.
Since we haven’t done anything to restrict SSH access yet, logging in via SSH from a remote machine should also work for
any valid account. I verified this by connecting through PuTTy from the domain
controller.
With everything working for username/password
authentication, we can move on to authenticating via SSH keys.
A quick note on this for the sake of
understanding what’s going on; Typically when we want to use key-based authentication for SSH we’ll put our public key in our Ubuntu home directory in the
~/.ssh/authorized_keys file. When we attempt to connect over SSH with our
private key, the SSH server service knows to check the authorized_keys file for
the matching public key and approves our authentication attempt. What we want to do instead is have SSH
check Active Directory for the altSecurityIdentities attribute on the
authenticating user account. To that end, we’ll configure ssh to check
AD instead of the local authorized_keys file.
Open the SSH config file:
nano /etc/ssh/sshd_config
Uncomment the AuthorizedKeysCommand and AuthorizedKeysCommandUser
values. Set the values as follows
AuthorizedKeysCommand /usr/bin/sss_ssh_authorizedkeys %uAuthorizedKeysCommandUser root
This configuration tells ssh to run the
sss_ssh_authorizedkeys executable with the %u (username) parameter instead of
directly checking the ~/.ssh/authorized_keys, and you remember that we
configured sssd to check the altSecurityIdentities attribute within AD,
which is what will be returned by this lookup. Great, right?

Save and exit the sshd_config file. Restart the ssh service (systemctl restart ssh.service) or reboot the server, to ensure that the new configuration is loaded.
All that’s left now is to create our SSH key pair and test the connectivity. To do that I’ll use PuttyGen to create a key pair for myself
to work with. Within the PuTTy Key Generator I left the default options and
clicked Generate to create a key pair for myself.
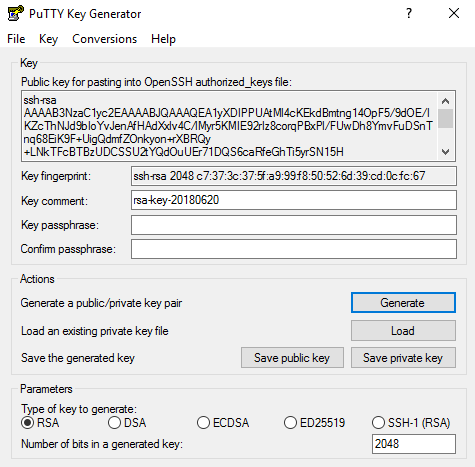
Since I’ll be using PuTTy from my Windows
machine to connect to Ubuntu, I saved the private key in PuTTy’s ppk format.
I also saved a copy of the public key as a text file for future reference.
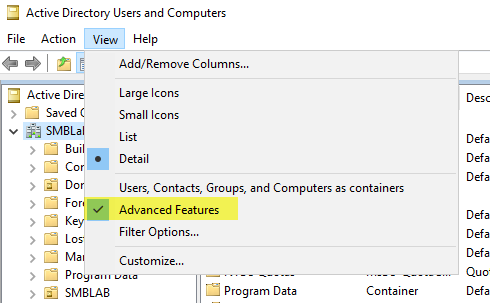
Next, let’s load our public
key into Active Directory. Once again I’m using my “murphy” account. We’ll need
to get to the Attribute Editor tab on the AD user account, and in order to do that
we need to enable Advanced Features within ADUC.
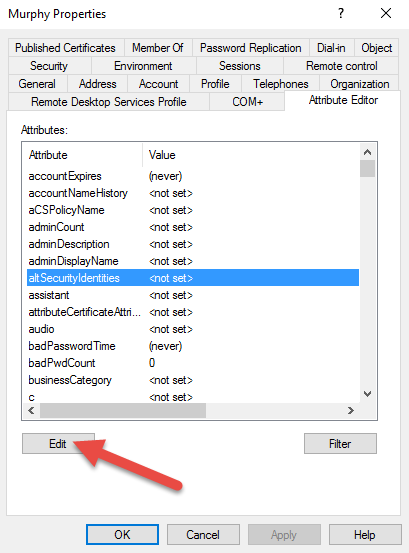
With Advanced Features enabled, open the user
account properties and navigate to the Attribute Editor tab. On the
Attribute Editor tab click on the Attribute altSecurityIdentities, then
click Edit.
This is where we’ll add the public key that we
created with PuttyGen. Note that the key needs to be one continuous line and
must be prefixed with ssh-rsa.
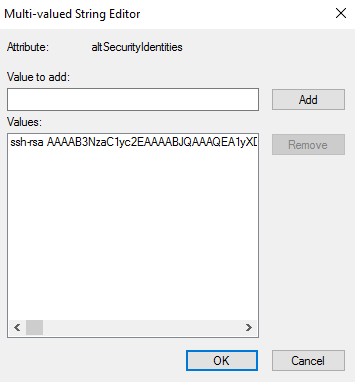
Once you’ve added the public key and clicked OK
(and OK again on the user account), we can load up PuTTy and try it out. Note
that we haven’t touched ~/.ssh/authorized_keys on the Ubuntu server so there
are no keys loaded directly onto the server.
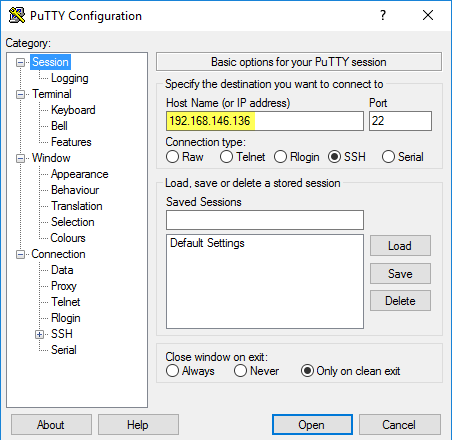
Launch PuTTy and provide the IP address of your
Ubuntu server:
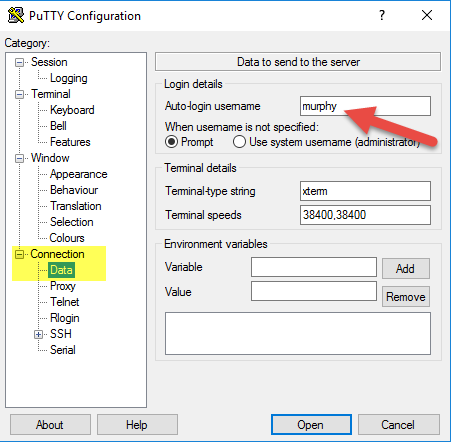
Next, go to the Connection > Data options and
add the username that you setup in AD with your public key. I used the “murphy”
account so that is what I’m configuring here.
Lastly, go to the Connection > SSH > Auth
options to add the private key file that matches the public key we configured
in AD.

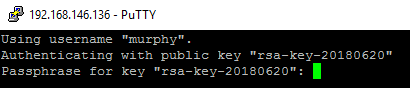
Now when we click Open, PuTTy will
provide the username and private key to Ubuntu, which will lookup the matching
public key in AD and authenticate the login. Since I set a passphrase on my private
key, I’m prompted to enter that here:
If key authentication fails, you’ll be prompted
for the matching user password:
If that’s the case, review your configurations
and verify things are set properly. If you’ve configured any services since the
last reboot, reboot again. One useful thing to note is that sssd will
cache domain login information just like many other services. To forcibly
expire that cache and tell sssd to go back to the source (AD), use this command:
sss_cache -E
- Installed Ubuntu and setup networking to talk to
DNS/Active Directory.
- Configured Kerberos to recognize our domain.
- Used realmd to configure sssd and join the AD domain.
- Configured sssd to let ssh use AD authentication.
- Configured ssh to lookup public keys stored in an AD
attribute via sssd.
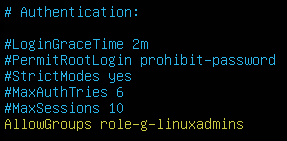
To take it a step further you can configure
AllowGroups within ssh to ensure that only authorized AD users can connect over
SSH. I created an AD security group named Role-G-LinuxAdmins and added my
“murphy” user to that group, then configured it within sshd_config.
You’ll need to restart the SSH service or reboot Ubuntu for that change to take
effect. You may also need to expire the sss_cache per the above if you’ve just
added your user to the new group.
That’s it! Now you can log in with AD
credentials or with a public key stored in AD. You can control access to SSH
with AD groups, and you can even set file/folder ACLs with AD users and groups.